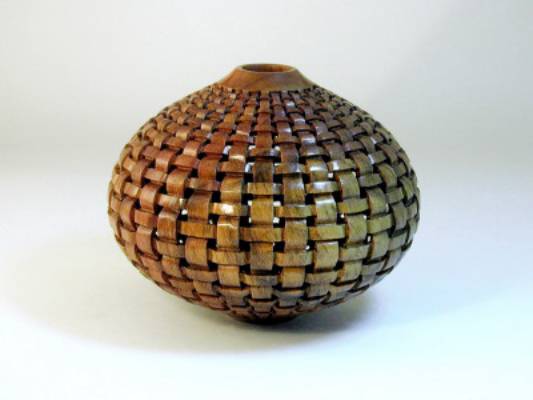
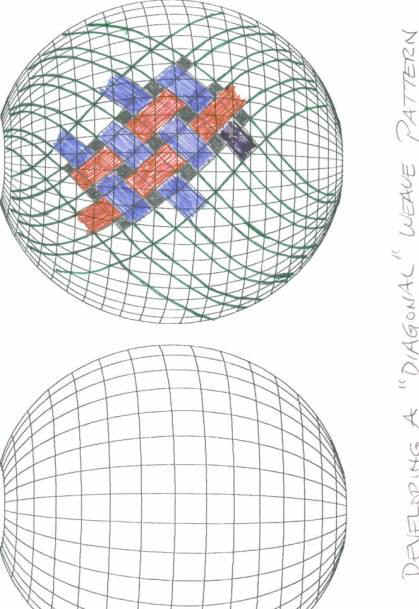
This piece was made in the following manner: the exterior shape was developed after it was first rough-turned and dried. I do not finish-turn the inside until I mark the pattern on the finished outside using an index wheel, scribing with a ball-point pen the longitudinal (vertical) and latitudinal (horizontal) lines, just like on a globe of the earth. You thus have a lot of what are called tessellations (squares) as a mosaic over the entire piece that converge to points at the top and bottom. Now this is the basis from which I can develop any number of patterns, either straight (as in this piece) or diagonal, basket weaves, or any number of motifs. It is essentially a grid or graph, in 3 dimensions. Since this piece is small, and I want the basket weave design to be in scale and not looking too coarse, I use a lot of lines to define the squares.
I used a 96-hole indexing wheel in this case so that the weave would be in scale. A One-Way lathe typically has a 48-hole wheel, and when I bought mine they added another 48 holes (halfway between the first 48, naturally!) for me. Now, the vertical bands are two spaces wide with one open space next to it before it repeats itself. To make the pattern come out exactly when you go around and back to the beginning, the number of spaces it takes to create a pattern before it repeats itself must divide evenly into the total number of squares around the piece. In this case, it takes three spaces before the pattern repeats (two for the band, one for the open space next to it), and of course 3 will divide into 96 exactly 32 times, so it will work!
Click here to see an example grid for developing your pattern.
Click here to see how to use the grid to make a straight weave pattern.
Showing how to do all this will be the basis for one of my demonstrations in Pasadena (at the AAW national meet, 2003), and once you see how it's done it's not too bad (trust me!) Since not too many people have a 96-hole indexing wheel, I will also show how to easily make and use one. In fact, I will show you how to make one with any number of equally-spaced holes just as easily! So, if for some reason, 73 equal spaces is a necessity--no problem! The illusion of a basket weave is such that the bands appear to cross over and under each other. This is done with a power carver and Dremel tool with custom-made miniature sanding discs (again easily made). The second installment will describe the cutting, sanding and finishing aspects of the work, as well as cutting all those little square openings. Let me end this installment by saying that once the pattern is defined, it is permanently burned into the wood with a fine tip before cutting. Now the real work begins!
J. Paul Fennell - Feb 1, 2003 Viewers
To obtain an "open" basket weave, the little squares have to be pierced through. This is somewhat a blessing in disguise because I still have to finish turn the inside of the vessel to its final wall thickness. I drill a hole in each of the little squares to a pre-determined depth--say 4 or 5 mm, put the piece back on the lathe, and with a fiber optics light through the opening along with a cutting tool, finish the inside.
Once I thin the inside to the 4 or 5 mm thickness, light will pop through the drilled holes, indicating I have reached the desired thickness. The tenon on the bottom of the piece is then turned off, and now the process of creating the actual basket weave illusion begins. The little square openings are then cut with my Power carver using a long tapered bit (No. 169L in the dental bit catalog). There are approximately 600-700 squares to be pierced in this piece, and it's a bit of a drag if I'm not listening to my favorite classical music station at the same time! Once that's accomplished, the same tool is used to cut about halfway through the rectangles comprising the vertical and horizontal bands.
These are then beveled to reduce the amount of sanding necessary to round over the bands, to simulate the crossing over-and-under illusion. Sanding is done with a Dremel tool using a mandrel and a small disc of sandpaper attached to it with a piece of double-sided tape (DS masking tape works well). I make all of my discs using leather punches of various diameters. Most of the sandpaper is fiber-backed for durability, starting with about 180P all the way up to 1200P. A jam-chuck is used to finish the bottom of the piece. One or two coats of Danish oil are used, and when dried, I buff the piece to bring out a luster before a final application of carnuba wax.
Now, almost invariably I'm asked just how long this whole process takes from start to finish: to be glib, I usually say "long enough to complete the job," but in reality my learning curve has reached an asymptote, so it goes rather quickly. I'm usually doing several pieces at the same time, making it difficult to assess the time it takes to complete one particular piece. However, this piece took me about a week working on it off and on. This has been a rather long dialog, but I hope it helps those who wanted to know.