Turning Square Edge Bowls
By Don Comer
Introduction:
There are some brave souls that just slap a square chunk of wood onto a screw chuck or faceplate and turn it down to some fantastic shapes while the corners fly around threatening carnage to fingers, tools and even the wood itself. I prefer a more cowardly approach, which I will describe below.
The approach I learned from Vic Wood of Australia is to glue sacrificial blocks to the four sides to support the "wings" or flanges of the bowl while they are being shaped. There are several advantages to this approach. If you look closely at the corners of a bowl that has been turned unsupported, you can see that the leading edge of the corner (the edge that strikes the tool first) is thinner than the trailing edge. This is because the force of the tool as it cuts deflects the wood away from the tool. Some turners minimize this effect by turning up the speed. This just terrifies me even more. Gluing on support blocks will also permit turning thinner wings without undue anxiety, as well as improve uniformity of thickness.
Another reason, and most important in my opinion, is safety is improved. You start turning with a rounded block and your fingers are not in danger from flying corners. It also reduces the hammering and chip-out that comes with turning a square block.
Procedure:
|
|
First prepare four surfaces for gluing, if necessary. Remove any wax, sealant or wavy surfaces that are obstacles to a good glue joint. A table saw or band saw cut is good enough for this purpose. Then prepare four support blocks for gluing around what will be the lip of the bowl. The wood of the blocks can be whatever is available. I have used pine and Douglas fir, just because they were in my scrap pile. You will turn and cut them away later so grain and texture are not important.
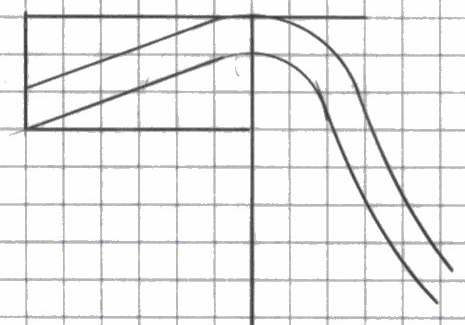
I make the length of the support blocks equal to, or a little longer than the width of the turning block as shown in Figure 1. If the blocks are a little longer, I can stagger their position and guarantee corner support. The width of the support blocks (w) should be at least 0.20 times the width of the turning block (W). This will insure a round block can be cut from the resulting glue up. The thickness of the glued-on blocks (t) will depend upon your design for the flanges or "wings", which we will discuss later.
After the glue has dried, saw the blank round, or hexagonal, on a radius that will just clear the corners of the original block. I locate the center of the original block on the face that will become the top of the bowl; drill a pilot hole and, using a simple shop made jig, band saw the assembly round. After the blank is round, use standard bowl turning techniques to do the turning operations. You can start by mounting the surface that will become the top of the bowl on a screw chuck or you can glue the foot end on a glue block. Both methods have pros and cons. I use either one, depending on the block I have.
After the turning is finished, you can create a true square edge bowl by bandsawing along the glue line between the support blocks and the turning block. Or you can saw and sand a curved edge to create a more individual effect. I draw paper patterns for intricate curves or I may just use a French curve to draw directly onto the turning if it’s not too complex. If I’m using paper patterns I make four copies and glue them on the corners with spray adhesive. Then I band saw close to the lines and finish shaping by sanding up to the lines with a drum sander mounted in a drill press.
Once that’s done, all that’s left is removing the glued-on paper patterns (use mineral spirits), touch-up sanding and applying your favorite finish. Now you have a truly unusual bowl to show your friends.
A Few Thoughts on Flange Design –
|
Edge of flange at minimum width
Figure 2 |
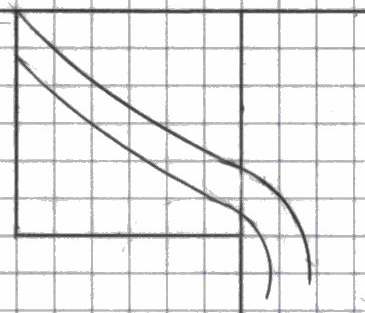
(Figures 2, 3 &4 are cross-sections taken through the corners of the block.)
The flange must be carried into the turning block far enough to avoid a "V" groove at the junction of it and the lower surface of the support block (Figure 2). Also the shape/sharpness of the edge after the supporting blocks have been removed will be largely determined by the angle the bowl wall intersects the glue joint. (I have drawn a dash to show the shape of the minimum flange on each of the figures,) Of course, you can hand carve and shape the edge differently but that is a lot of extra work.
|
Figure 3 |
As for the slope of the flanges; a flat flange can obviously get by with a thinner support block than one that is sloped either up or down, but it should be very close to flat or it will look like you tried to make it flat and failed. The downward sloping flange (Figure 3), can give a nice square edge at the minimum point. But it can seem wilted or weak. I prefer upward sloping flanges (Figure 4). The upward sloping flanges seem to me to project more alive, energetic and inclusive.
|
Figure 4 |
Of course, this is only a beginning to the possibilities of what can be accomplished using this approach. Your imagination can be a major
ingredient. Good luck on your next attempt.