|
Presentation
by Bill Haskell
1. The
turning of a hollow vessel can be done from either a faceplate or a
4-jaw chuck.
I prefer a 3" faceplate A 4-jaw chuck will usually work fine if
secured properly
2. All
outside turning and sanding should be completed before starting on
the inside
Leave the area immediately attached to the faceplate, or 4-jaw
chuck, as well as the neck opening, larger than the final form to
give strength to these areas while turning the inside.
Turning the foot and neck ends to a final form will be the two last
things done after everything else is complete.
Complete all sanding, down to the final grit.
When I use a CA finish, this is the time I apply it:
With the lathe stopped, squeeze a drop or two of medium viscosity CA
glue to the piece, and immediately spread with a covered finger.
Use a latex glove, just a latex finger cot, or a piece of Saran Wrap
stretched over the finger and held in place with the other fingers.
Apply to a 2-3 square inch area at a time. Smooth out quickly, or
else the glue will start to set up. Do not go over same area more
than three times.
A CA finish will also provide strength if a thin wall is planned and
if there are weak areas in the stock.
Briefly and lightly sand the CA coat with the lathe on, and smooth
out the rough surface (220 grit) – be careful to not sand through
the surface.
With the lathe off, hand sand where there are low shiny spots,
"orange peel" dimples, or other imperfections. This takes
some patience, but this is where the difference between a good and
poor finish is determined.
After finish is smooth, sand with 320 grit and burnish with 00 steel
wool with the lathe on.
Apply a second coat, repeating the steps described above.
3. To turn
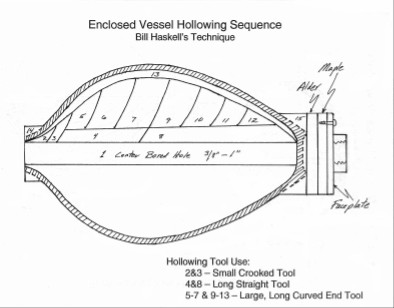
the inside, drill a center hole down the full length of the vessel,
to where the inside bottom will be (usually ½ to ¾ of an inch from
the outside bottom).How thick you leave the bottom at this point
depends on how you plan to turn and finish the bottom (parting loss
and concavity).
This center hole removes the hard to turn center core, plus it helps
you know where the bottom of the inside is when turning on the
inside "in the blind".
4.Two
methods of drilling are:
Using a twist drill bit long enough, held by vice grips or a handle,
insert at the exact center of revolving piece.
Push in and drill to the desired depth, removing often to extract
sawdust.
If left in too long, the sawdust will swell and bind, making it
difficult to extract the bit.
Richard Raffan and John Jordan use this approach.
Craft Supply, Provo, has a 3/8" by 12" depth drill for
this purpose.
Using a planetor or forrestner bit held in a tailstock Jacobs chuck.
Extract often to remove sawdust.
Use a bit extension if deeper drilling is required.
I usually use a 1" or 1¼" bit, but smaller and larger
sizes may also be used.5. Measure to determine depth of center hole:
Drill all the way; it is difficult to return later with either a
drill or a turning tool to go deeper.
5. A
simple dowel or any kind of a rod (or even a lathe tool) inserted
into the center hole will tell you how deep the hole is - remove the
depth measuring item and place it in front of the piece, lining up
with the top of the piece, and it will tell you how close the hole
is to the outside bottom.
6.I use a
steady rest if the piece is longer than about 10".
7. There
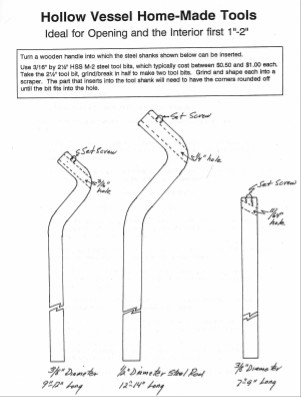
are a number of turning tools available, or ones that can be made
with which to turn the inside of the vessel - many use a small
3/16" machinist's cutting tool.
Dennis Stewart System with arm braced handle
David Elsworth's crooked tools for smaller vessels
The Steve D'Arc/Bob Devoe Roto-Excavator
Woodcut (New Zealand tool) Mighty Midget, Cobra, Promaster
Glaser Boring Bar with articulated cutting bit
8. To
hollow, start at the top, just inside the neck - I hog out all the
way down inside to a wall thickness of about ½" to
5/8".Stop the lathe often to remove sawdust and chips –
methods include:
Finger or a small long handled "rake" made for this
purpose.
Take piece off the drive spindle and shake out.
Either compressed air to blow sawdust out (best), or a vacuum to
suck out sawdust.
When wall thickness is under 1", measure thickness with
calipers often.
Use a light source (small flashlight or anything else that will
direct light inside your vessel) to see what is happening.
When turning thin, fragile walls may require support – e.g. CA
glue, masking/duct tape, wire girdle, etc.
Strengthen or repair cracks with CA glue.
Then starting at the top, I will take the wall thickness down to
about ¼ ".If there are bark inclusion windows on the wall, or
if there is a visible center nub on the inside bottom, I will sand
it off (with lathe both still and running) with a small (1-1½
" disk) on an extension mounted in an electric drill.The very
last cutting I do on the inside is with a scraper on a Stewart tool,
to take the wall down to about 3/16" and to smooth out ridges.
9. When
the inside is done, turn the neck, the opening, and just inside the
opening to a final configuration, and sand - If a finish is being
applied on the lathe, do so to the just turned area.
10. When
all but the fat bottom is complete, part the piece off.
11. Use a
center finder or compass to determine as precisely as possible the
center on the bottom, and mark.
12. Turn a
tenon on scrap wood on either a faceplate or 4-jaw chuck that fits
tightly into the opening of the hollow vessel – usually, the tenon
does not have to be any more than ½" – 1" long.
13.
After again remeasuring the bottom thickness, mount the vessel onto
the tenon, and bring up the tailstock to the center mark on the
bottom.
The smallest diameter and longest live center cup will provide more
room to work on the bottom.
Turn the lathe on to test for concentricity - if out of round, stop
and loosen the tailstock and adjust until concentric.
To help determine where the out-of-round side is, using the tool
rest to support a pencil, touch lightly the revolving bottom section
- stop the lathe to adjust the tailstock. The pencil line shows the
high spot, which needs to be pushed slightly in the opposite
direction, then tighten the tailstock.
Turn lathe
on and test - repeat the foregoing steps if further adjustment is
needed, until the piece is in round without wobble.
14. Turn
the excess material off near the bottom that was left on for
support.
Create the final configuration of the bottom sidewalls.
After sanding the sidewall to a final finish, turn the very bottom.
Small or miniature gouges, round scrapers, and skews work best.
15. After
the bottom has been turned and sanded, the center nub where the cup
center is, can be turned to a conical shape, very carefully, down to
about 3/16" where it contacts the bottom surface of the piece.
16. Stop
and remove your piece from the lathe – all turning is done.
17. With a
carving tool, pare-off the remaining nub - hand sand to finish the
bottom.
18. Sign
your finished product. |

