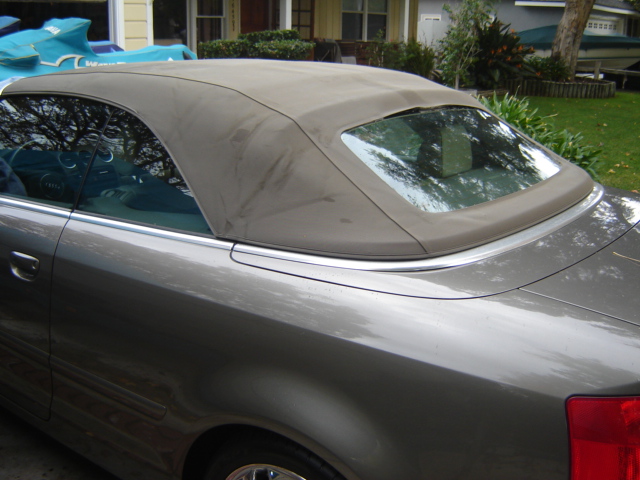
My name is Craig and My wife and I own a 2003 Audi A4 with
a convertible top. A couple of years ago we noticed that the wind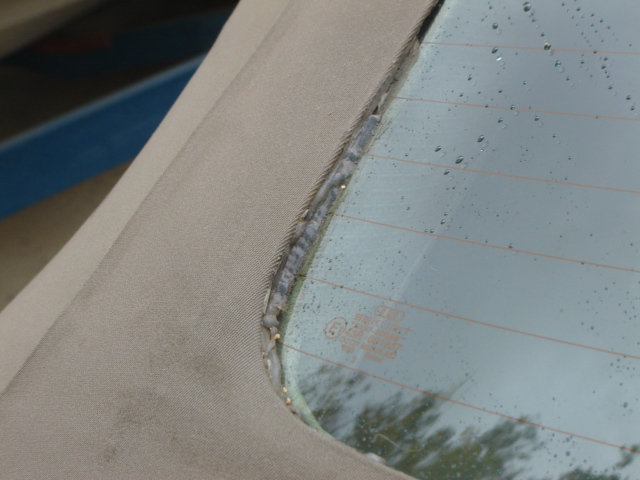 ow
in the back was separating from the cloth. We were just out of warrantee
and we spoke to our Audi dealer but to no avail. A new Audi installed top
runs about $5,000 installed. Quite a bit. More than I wanted to
spend. So I searched the Internet and at the time, nobody was making a top
for that year model. This left few choices so I attempted to glue
the window in with Epoxy first. But it didn’t hold to the glass.
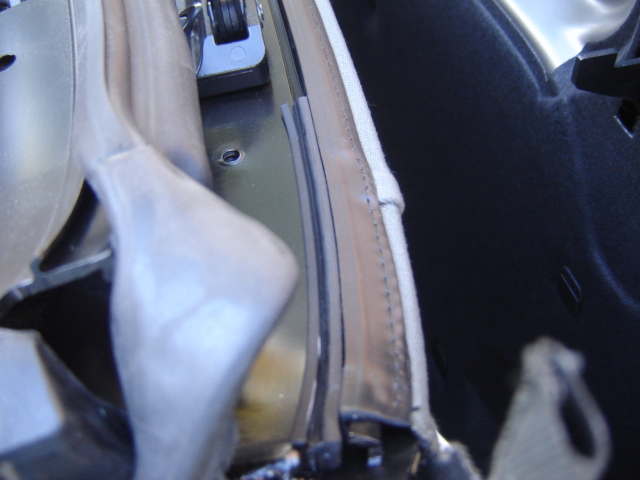
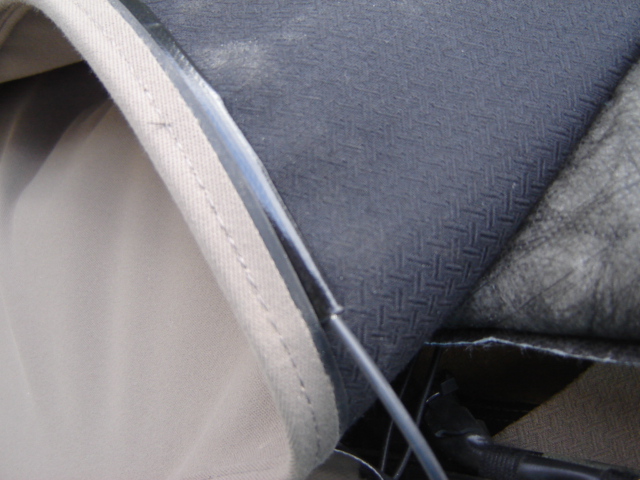
Then I tried Silicone as you can see in the photo But the problem is that there
is no way to press the glass and cloth together for long enough to get a good
bond. A year went by and things were getting worse. During the winter, enough
water seeped through to leave the back panel a mess and stain the headliner a
bit. I searched again in December 2008 and found several companies now
manufacturing the top. It turns out that one of them was just a few miles away
from my home, so off I went. The Company is GAHH. They provided me a choice of
colors and a sample. Everything seemed OK even the price was fair Approximately
$1,250. A few days later, I picked it up.
ow
in the back was separating from the cloth. We were just out of warrantee
and we spoke to our Audi dealer but to no avail. A new Audi installed top
runs about $5,000 installed. Quite a bit. More than I wanted to
spend. So I searched the Internet and at the time, nobody was making a top
for that year model. This left few choices so I attempted to glue
the window in with Epoxy first. But it didn’t hold to the glass.
Then I tried Silicone as you can see in the photo But the problem is that there
is no way to press the glass and cloth together for long enough to get a good
bond. A year went by and things were getting worse. During the winter, enough
water seeped through to leave the back panel a mess and stain the headliner a
bit. I searched again in December 2008 and found several companies now
manufacturing the top. It turns out that one of them was just a few miles away
from my home, so off I went. The Company is GAHH. They provided me a choice of
colors and a sample. Everything seemed OK even the price was fair Approximately
$1,250. A few days later, I picked it up.
Installation: This is the real reason I have written this. I am a do-it-yourself kind of guy. I work under the assumption, why pay someone to do something if you can do it yourself. It can’t be that hard. I got quotes from $1,100 down to $325 from local upholstery shops. At $325, I really considered paying for it, but it’s my wife’s car and she would have to rent a car for a few days so I decided to do it myself. I searched for instructions on the Internet and could not find anything for my car. I even looked for an Audi repair manual but I couldn’t review one prior to purchasing so I decided to start on a Saturday morning.
These instructions are what I did and what I learned from doing it. I made some mistakes, things I didn’t need to do. I have edited this to do it right. Mind you, this may not be anything like the “official technique”.
Tools needed: Phillips screw driver, a large and a narrow slot screw driver, Awl, Dull putty knife, needle nose pliers, standard pliers, Tube of black silicone glue good for rubber and cloth. Heat resistant. Drill for removing rivet. Small Black wire ties.
Now there are some other things that happened that I would tell you about.
First. If you leave the top in a position for a while, after a few minutes, maybe 5 or 7, the hydraulics depressurize and the top moves unexpectedly. A few times the top and the rear compartment lid got out of sync and the dashboard light came on and refused to operate. We had to manually release the compartment lid with the special tool. See your owners guide for this procedure. Sometimes we moved the frame without the use of the motors. Since I had no instructions, I moved the frame around a lot, perhaps much more than if I had these instructions.
1. Start by removing the rubber weather stripping over the driver side window to the front edge. Be gentle with the rubber, as you don’t want to damage it. Partially move the top to the down position until the hinge bends and you can access the end piece. Use a screwdriver or dull putty knife and pull out the weather stripping toward the front windshield.
2. Repeat process on the passenger side. In fact, almost
everything needs to be done on both sides.
3. Remove the plastic molding under the lead edge of the convertible top.
Move top to the down position just before the trunk lid (not really the trunk,
but the compartment lid for the top in the down position) begins to close.
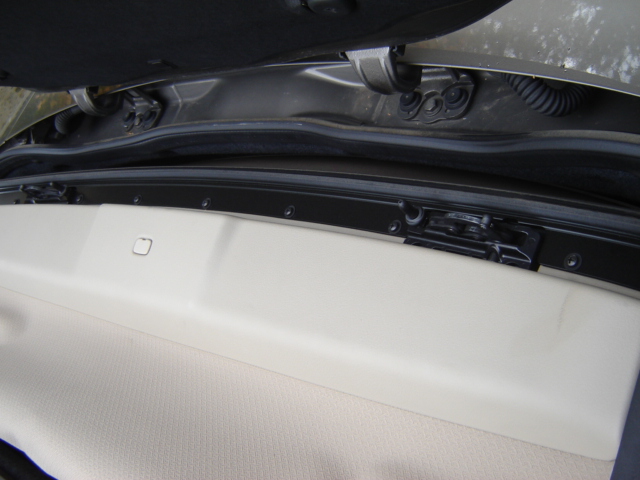
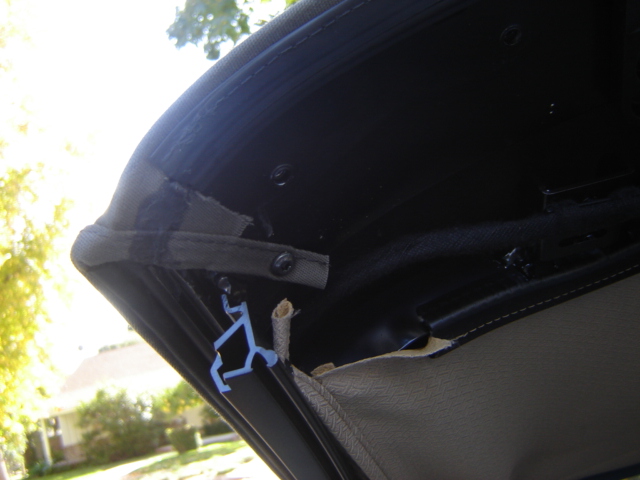
(In the photo to the right, you are looking at the plastic molding piece that is
above your forehead when you are driving retracted all the way back in the
compartment. The compartment lid is hinged straight up at the top of the
photo.)
Remove the screws all the way across. (In the photo just above the
molding.) Now pop the molding. Mine was pretty
stuck so I used a large screwdriver to get into the piece and pry the metal
spring clamps apart. Don’t pull very hard as you may damage this molding
piece. When you release this, the entire piece can be removed from the car.
You will need to remove the glue in the corners from the rubber.
4. Remove the keeper strips. There are three narrow plastic wedges (In the photo the large one is vertical in the center.) that hold the lead edge of the cloth. One is large in the center and the other two are short on either side. My new top did not require these strips to be reinserted but I didn’t know this at the time. I suggest that you remove them carefully as to not damage them too much. They are not rubber but plastic and a bit rigid. Now the lead edge should be free.
5. At the corners, a strip of cloth I will call a seam extension is folded over and screwed down to hold it. Unscrew and be sure not to loose them. In the photo, you can see the screw in the middle.
6. Remove the side keepers on the front panel. (I define the panel as the section of the roof. The front panel is from the most forward edge of the top to the first hinge.) They simple require some pulling down and away to release. Roll this section of the cover back. Notice that there is a small silver hook in the frame attached to a wire cable. Go ahead and release the hook from the frame.
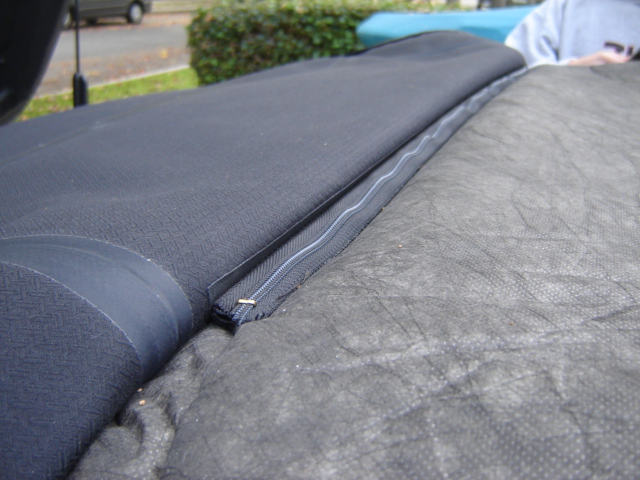
7. Undo the zipper. You will notice a zipper holding the cloth to a thick pad. It is used for body and probably soundproofing. There are small flat staples at either end. Remove them with a needle nose pliers and keep them. You will need to reinstall them. Unzip the zipper.
8. Repeat this unzipping process and keep rolling back the panels.
9. Remove the roof from the third panel (The cloth is not
attached to the second panel). Retract the roof to a point where the third
panel is close to vertical. Again with a needle nose pliers, pull down on the
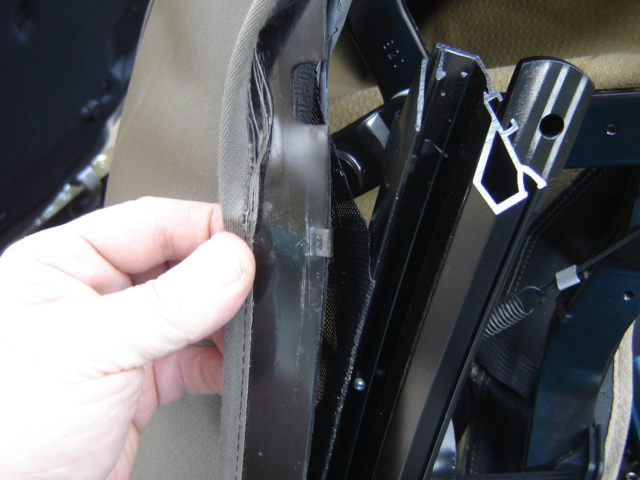
cloth. There is a hard plastic strip about 1” wide (See photo, my
thumb is holding the seam with the plastic strip.) and the length of the panel
inserted in a slot in the frame. If you cannot pull it, you might pull out the
weather strip (In the photo, the weather strip is out). There are metal slot keepers in the
slot which will make it harder. In the photo, one of the slot keepers is
visible even with my thumb. Try to pull perpendicular to the metal frame.
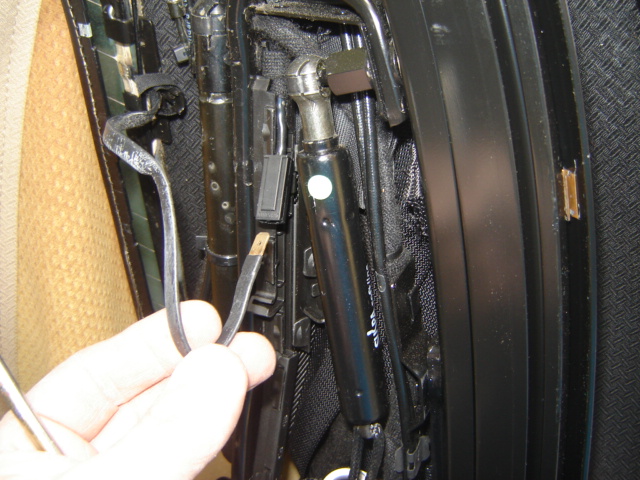
There is also a piece of vinyl sewn into the cloth that extends toward the middle
of the roof. It
has a cord attached to it and it is riveted into the frame at the end. I am not
sure what this really does but there is no way to remove it without ripping it
off or drilling out the rivet. I will discuss this more during reinstallation.
10. Pull the cable running along the edge of the cloth out of the plastic tube sewn into the seam. It has a metal s-hook that was inserted into the frame near the front window. You unhooked it in step 6.
11. Remove the electrical connection to the heated window. You will have to move the top to a position where the rear edge of the top is vertical. Find the wire leading from the rear window. Follow it to a plastic strip connected to the frame. Cut the plastic wire tie. You should replace this wire tie on installation. Open the plastic hinged strip and pull out the connector. The flat ribbon cable has a spade connector. It can be pulled straight out. Repeat process on both sides of the window.
12. Remove weather strip around the bottom of the rear frame. This is the strip that lands on the rear deck.
13. Remove the cloth from the frame around the back.

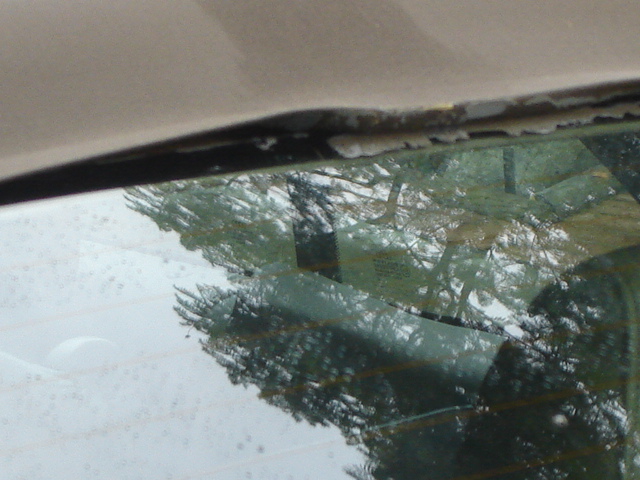
14. Unclip the headliner from the window. It has a plastic strip sewn into the headliner. Try not to damage the plastic edge.
15. Last piece is what I call the sliders on a cable. It allows the window to slide up and down the steal wire. Slide the plastic piece out of the housing. You may need a screwdriver to pry it out of the tube.
You should be able to remove the entire roof now..
Reinstallation:
Of course, this assumes that the top is properly fitted and manufactured correctly.
I started at the back and worked forward. It was a bit difficult to work the very front edge but it did work. So I will describe it as I did it.
Basically just run the steps backwards. I will go step by step describing mostly the differences.
16. Place the rear window in place and install the plastic slider on the wire. This will keep the window in place.
17. Wire the electric heater. My wires were installed backwards, probably an error. The wire was soldered onto the window going in, not out. I had to bend them 180 to the outside. Don’t connect them to the electrical circuit yet. Just bend them out. Make sure you position them correctly around the slider cable.
18. Clip the headliner into the window frame. There are probably metal keepers still on the plastic strip on the headliner. There should be new clips in the groove on the window. If there are, remove the pieces from the plastic strip. The tricky part is to get it in the correct place, left to right. With the compartment cover in the way, it’s hard to access. You may have to play with it a bit. The electrical wire should between the glass and the plastic headliner frame. Install the electrical circuit now.
19. Connect the rear edge of the cloth to the frame and reinstall the rubber weather strip across the back.
20. Re-zipper each zipper as you go. I was provided a zipper pull to do this. You should have been also. Use the staples that you pulled out. If you cannot get the staples back in, you could try staple gun staples manually pushed through and closed with a pliers or even a needle and nylon string. Do anything to keep the zipper from unzipping. Don’t use anything large and round as you will be able to feel it through the cloth. It is unlikely to get wet underneath the top but you don’t want to use anything that may rust either.
21. Now you will need to thread the cable through the vinyl tube sewn into the edge of the cloth described in step 10. I was unable to push the cable through due to crimping of the tube and the length. You are going to have to be a bit creative if you can’t thread it. I used a piece of electrical wire, pushed it through. Then drilled a little hole in the copper wire. A very small drill was used after I flattened the copper. Then attached some fishing line. Then pulled it through. Tied the fishing line to the s-hook and used it to pull it through. You might be able to use a coat hanger but it was too narrow to put a hook on the end. Good luck. Maybe tape.
22. Connect the 3rd panel by inserting the plastic strips into the narrow slot. The vinyl strip should be reinstalled as well. I widened the small hole a bit, rotated the metal connector that connects the two ends of the cord together and pushed that through. You could also wire tie it or find some other way to connect it. At the end of the vinyl strip, it is connected to the frame with a rivet. If you have a rivet gun and the correct size and length rivets, you could drill it out and connect it just as before or you could punch another hole and wire tie it to the frame. Reinstall the rear rubber weather-stripping all the way to the end of the frame 3rd panel if you removed it in step 9.
Roll the cloth forward re-zippering as needed.
23. Connect the first panel. This is where my replacement top did not match the old top. The plastic connector tabs on the sides of the first panel have a hook that clips over the frame piece but it also has a protrusion that appears to go into a slot in the frame. Check it out. It wouldn’t fit and if you forced it in, the hook won’t be in the correct spot. Compare it to the old top. At this point, I simply clipped it into place and hoped. I was hoping that the protrusion wouldn’t show much. The Jury is still out. It was very hard to clip it in. The first side goes on easily but the top is tight that the second side was very hard. The cloth must be far enough forward to have the front edge wrap around frame and go into the slot in the underside.
24. Wrap the seam extension over the front edge making sure that the front edge will go into the slot. I actually used some large wood clamps to hold the edge into the slot. This kept everything in position front to back and left to right. When you are sure, poke a hole in the seam extension and screw into the frame. Make sure you use the correct hole. There is another hole nearby.
25. Glue the corners. You may have noticed that at the corners, there was some glue between the cloth and the rubber weather-stripping. I bought a tube of black silicone from an auto parts store good for rubber, cloth and glass. I ran a glob across the seam extension. Remove any glue from the weather stripping attached to the plastic molding if you did not already do so at the end of step 3. Do a dry fit. You will notice that the cloth right there is not very flat and there is a potential leak point. Do your best to put the glue on without getting any on the outside of the cloth. I did this in the position of that panel all the way back upside down.
26. Put the front edge strip into the slot. Again, this strip is different then the original. There is no way to hook this edge into the frame. And there is no way to reinsert the wedge strip. I assume that that is by design. If this is your situation, just make sure the strip is in the slot. Then proceed. If you can hook it, do so and reinstall those 3 wedge strips.
27. Install the panel by popping the panel into place. Remember those spring clips, get them into position. Make sure the strip stays in the slot. Pop the molding into place. Check the black steal strip alignment with its screw holes and make sure it holds the strip in. Screw them down. If the strip comes out, the black metal bar will be too far from the frame. Mine went in pretty easily but yours may not. Install the weather stripping wherever you removed it. Check the corners. See if you think that there is a leak opportunity. You may want to backup a step and insert glue in there. But until you get to this point, it is hard to see where you need it.
28. Your roof is just about done. Go ahead and put the top up. Mine would not completely close. I had to help it close with my hand. It was so tight that the rear window seal actually came up about ¼ inch. Leave the top up for a few days to stretch it out.
That’s it.
When you are done, send me an email. Tell me how it went for you, how long it took, etc. Craigs@sobelsoftware.com